
|

|
|
Setting up Yxa with two phonesIf you have two SIP phones and just want to test VoIP with Yxa, this document should be worth reading. The following is a small diagram about the setup we are talking about :
Connection diagram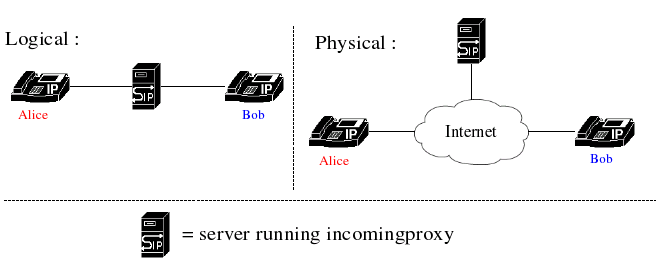
incomingproxy - your SIP-proxy/registrarA call from a caller (Alice) to a callee (Bob) using SIP generally requires Bob to have one or more user agents (phones) that has registered themselves with Bob's "address of record". Bob's address of record in this example is sip:bob@example.org.User agents register themselves at the registrar of the users home domain. In this example, Alice and Bob are in the same domain (example.org) and we don't have to go into the details about how a user agent finds out where to register itself. Most VoIP phones let you configure the name of your registrar when provisioning the phone. In this example, the name of our SIP-proxy/registrar is incomingproxy.example.org. Since the Yxa application incomingproxy is capable of acting as a registrar for your domain as well as being a general purpose SIP router, an incomingproxy is all you will need for starters.
Configuring the incomingproxyYou don't need much configuration to achieve your goal. You need to build incomingproxy according to the instructions in the README file, make a basic incomingproxy.config file and then you need to set up some user accounts.There are currently three different user database backends available :
The simplest database backend to start with when you just want to get things working is the plain file, and that is the one we are going to use in this example. Create a directory for incomingproxy's log files. I will presume /var/log/yxa/. incomingproxy.config :
[{incomingproxy, [{sipauth_realm, "example.org"},
                  {sipauth_password, "enter random string here"},
                  {logger_logbasename, "/var/log/yxa/incomingproxy"},
                  {userdb_modules, [sipuserdb_file]},
		  {sipuserdb_file_filename, "/var/yxa/userdb"},
                  {myhostnames, ["incomingproxy.example.org"]}
                ]}].
If your server has multiple hostnames, enter them all in the myhostnames list. Example :
{myhostnames, ["incomingproxy.example.org", "server1.example.org"]}
Yxa user database principlesYxa has a modular interface for database backends (called sipuserdb). Different backends can store the data in any way it likes, but the basic model could be described as a relational database where each user can have multiple addresses.A user has a basic set of attributes :
File user database configurationFor our example, the following would be a minimalistic but sufficient file user database (/var/yxa/userdb in the configuration example above) :/var/yxa/userdb :
[
 {user, [
         {name, "alice@example.com"},
         {password, "secret"},
         {classes, [internal,national,mobile]}
        ]},
 {user, [
         {name, "bob"},
         {password, "alsosecret"},
         {classes, [internal]}
        ]},

 {address, [
            {user, "alice@example.com"},
            {address, "sip:alice@example.com"}
           ]},
 {address, [
            {user, "bob"},
            {address, "sip:bob@example.org"}
           ]}
].
That's about it. Now go and configure Alice and Bob's phones and watch the incomingproxy log files in /var/log/yxa/ for problems. You should see the phones sending REGISTER and incomingproxy should log things like incomingproxy: REGISTER bob@example.com at sip:bob@192.0.1.123:5062;transport=udp (priority 100, expire in 900) in incomingproxy.log, which is the log file for normal operations. After that, when you make the call from Alices phone to Bobs phone, you should see incomingproxy sending the INVITE on to Bob's phones registered location (sip:bob@192.0.1.123:5062). If something is not working, look at the logging in incomingproxy.debug to get more information about what is not right.
$Id: 2phones.html,v 1.3 2005/01/04 14:35:10 ft Exp $ |

|
|